
https://gitee.com/lkyuan4/spring-cloud-demo
概述:本文适用于新入门的童鞋参考,一步步创建一个新的Spring Cloud项目。
一、配置nacos注册中心
1、下载地址 home
2、解压后在bin目录windows下双击startup.cmd 启动,停止使用shutdown.cmd


3、验证
http://localhost:8848/nacos/index.html
默认帐号密码均为 nocos

二、新建测试项目
1、目录说明
demo
– demo-gateway #网关模块 8000
– demo-test #测试模块 8001

2、步骤
1)创建demo
File->New->Project

选择Maven,对应的SDK版本,然后下一步

输入项目名称,选择目录路径,填写对应的信息,然后完成

修改pom.xml文件(参考)
<?xml version="1.0" encoding="UTF-8"?>
<project xmlns="http://maven.apache.org/POM/4.0.0"
         xmlns:xsi="http://www.w3.org/2001/XMLSchema-instance"
         xsi:schemaLocation="http://maven.apache.org/POM/4.0.0 http://maven.apache.org/xsd/maven-4.0.0.xsd">
    <modelVersion>4.0.0</modelVersion>
    <groupId>org.example</groupId>
    <artifactId>demo</artifactId>
    <packaging>pom</packaging>
    <version>1.0-SNAPSHOT</version>
    <modules>
        <module>demo-gateway</module>
        <module>demo-test</module>
    </modules>
    <dependencyManagement>
        <dependencies>
            <!-- spring cloud 依赖 -->
            <dependency>
                <groupId>org.springframework.cloud</groupId>
                <artifactId>spring-cloud-dependencies</artifactId>
                <version>2020.0.3</version>
                <type>pom</type>
                <scope>import</scope>
            </dependency>

            <!-- spring cloud alibaba 依赖-->
            <dependency>
                <groupId>com.alibaba.cloud</groupId>
                <artifactId>spring-cloud-alibaba-dependencies</artifactId>
                <version>2021.1</version>
                <type>pom</type>
                <scope>import</scope>
            </dependency>
            <!-- Alibaba Nacos 配置 -->
            <dependency>
                <groupId>com.alibaba.nacos</groupId>
                <artifactId>nacos-client</artifactId>
                <version>2.0.3</version>
            </dependency>

            <!-- SpringBoot 依赖配置 -->
            <dependency>
                <groupId>org.springframework.boot</groupId>
                <artifactId>spring-boot-dependencies</artifactId>
                <version>2.5.3</version>
                <type>pom</type>
                <scope>import</scope>
            </dependency>
        </dependencies>
    </dependencyManagement>

    <dependencies>
        <!-- bootstrap 启动器 -->
        <dependency>
            <groupId>org.springframework.cloud</groupId>
            <artifactId>spring-cloud-starter-bootstrap</artifactId>
        </dependency>
    </dependencies>

</project>
2)创建demo-gateway模块
在当前项目目录下,右键->New->Module

选择对应SDK,然后下一步

填写对应信息

修改pom.xml文件(参考)
<?xml version="1.0" encoding="UTF-8"?>
<project xmlns="http://maven.apache.org/POM/4.0.0"
         xmlns:xsi="http://www.w3.org/2001/XMLSchema-instance"
         xsi:schemaLocation="http://maven.apache.org/POM/4.0.0 http://maven.apache.org/xsd/maven-4.0.0.xsd">
    <parent>
        <artifactId>demo</artifactId>
        <groupId>org.example</groupId>
        <version>1.0-SNAPSHOT</version>
    </parent>
    <modelVersion>4.0.0</modelVersion>

    <artifactId>demo-gateway</artifactId>
    <dependencies>

        <!-- SpringCloud Gateway -->
        <dependency>
            <groupId>org.springframework.cloud</groupId>
            <artifactId>spring-cloud-starter-gateway</artifactId>
        </dependency>

        <!-- SpringCloud Alibaba Nacos -->
        <dependency>
            <groupId>com.alibaba.cloud</groupId>
            <artifactId>spring-cloud-starter-alibaba-nacos-discovery</artifactId>
        </dependency>

        <!-- SpringCloud Alibaba Nacos Config -->
        <dependency>
            <groupId>com.alibaba.cloud</groupId>
            <artifactId>spring-cloud-starter-alibaba-nacos-config</artifactId>
        </dependency>

        <!-- SpringCloud Openfeign -->
        <dependency>
            <groupId>org.springframework.cloud</groupId>
            <artifactId>spring-cloud-starter-openfeign</artifactId>
        </dependency>

        <!-- SpringCloud Loadbalancer -->
        <dependency>
            <groupId>org.springframework.cloud</groupId>
            <artifactId>spring-cloud-starter-loadbalancer</artifactId>
        </dependency>

        <!-- SpringBoot Actuator -->
        <dependency>
            <groupId>org.springframework.boot</groupId>
            <artifactId>spring-boot-starter-actuator</artifactId>
        </dependency>

    </dependencies>

</project>
在java目录新建包com.demo.gateway及启动类 GatewayApplication.java
package com.demo.gateway;

import org.springframework.boot.SpringApplication;
import org.springframework.boot.autoconfigure.SpringBootApplication;

@SpringBootApplication
public class GatewayApplication {

    public static void main(String[] args)
    {
        SpringApplication.run(GatewayApplication.class, args);
        System.out.println("网关启动成功");
    }
}
在resources新建bootstrap.yml文件
# Tomcat
server:
  port: 8000

# Spring
spring:
  application:
    # 应用名称
    name: demo-gateway
  profiles:
    # 环境配置
    active: dev
  main:
    allow-bean-definition-overriding: true
  cloud:
    nacos:
      discovery:
        # 服务注册地址
        server-addr: 127.0.0.1:8848
      config:
        # 配置中心地址
        server-addr: 127.0.0.1:8848
        # 配置文件格式
        file-extension: yml
        # 共享配置
        shared-configs:
          - application-${spring.profiles.active}.${spring.cloud.nacos.config.file-extension}
在nacos配置中心 http://127.0.0.1:8848/nacos/ 配置demo-gateway-dev.yml

spring:
  cloud:
    gateway:
      discovery:
        locator:
          lowerCaseServiceId: true
          enabled: true
      routes:
        # 系统模块
        - id: demo-test
          uri: lb://demo-test
          predicates:
            - Path=/test/**
          filters:
            - StripPrefix=1
启动GatewayApplication.java,成功后在nacos配置中心的服务管理-服务列表可看到demo-gateway服务
3)创建demo-test模块
创建步骤参考demo-gateway模块,下面主要列代码及配置

pom.xml文件参考
<?xml version="1.0" encoding="UTF-8"?>
<project xmlns="http://maven.apache.org/POM/4.0.0"
         xmlns:xsi="http://www.w3.org/2001/XMLSchema-instance"
         xsi:schemaLocation="http://maven.apache.org/POM/4.0.0 http://maven.apache.org/xsd/maven-4.0.0.xsd">
    <parent>
        <artifactId>demo</artifactId>
        <groupId>org.example</groupId>
        <version>1.0-SNAPSHOT</version>
    </parent>
    <modelVersion>4.0.0</modelVersion>

    <artifactId>demo-test</artifactId>
    <dependencies>

        <!-- SpringCloud Alibaba Nacos -->
        <dependency>
            <groupId>com.alibaba.cloud</groupId>
            <artifactId>spring-cloud-starter-alibaba-nacos-discovery</artifactId>
        </dependency>

        <!-- SpringCloud Alibaba Nacos Config -->
        <dependency>
            <groupId>com.alibaba.cloud</groupId>
            <artifactId>spring-cloud-starter-alibaba-nacos-config</artifactId>
        </dependency>
        <dependency>
            <groupId>org.springframework</groupId>
            <artifactId>spring-web</artifactId>
        </dependency>

        <!-- SpringBoot Web -->
        <dependency>
            <groupId>org.springframework.boot</groupId>
            <artifactId>spring-boot-starter-web</artifactId>
        </dependency>
        <dependency>
            <groupId>org.projectlombok</groupId>
            <artifactId>lombok</artifactId>
        </dependency>

    </dependencies>

</project>
在java目录新建包com.demo.test及启动类 TestApplication.java
package com.example.test;

import org.springframework.boot.SpringApplication;
import org.springframework.boot.autoconfigure.SpringBootApplication;

@SpringBootApplication
public class TestApplication {
    public static void main(String[] args)
    {
        SpringApplication.run(TestApplication.class, args);
        System.out.println("测试启动成功");
    }
}
在resources目录下创建bootstrap.yml
# Tomcat
server:
  port: 8001

# Spring
spring:
  application:
    # 应用名称
    name: demo-test
  profiles:
    # 环境配置
    active: dev
  cloud:
    nacos:
      discovery:
        # 服务注册地址
        server-addr: 127.0.0.1:8848
      config:
        # 配置中心地址
        server-addr: 127.0.0.1:8848
        # 配置文件格式
        file-extension: yml
        # 共享配置
        shared-configs:
          - application-${spring.profiles.active}.${spring.cloud.nacos.config.file-extension}
在nacos配置中心 http://127.0.0.1:8848/nacos/ 配置demo-test-dev.yml
我这边是没有内容的,根据实际情况修改

创建controller包及TestController.java测试类
package com.example.test.controller;

import org.springframework.web.bind.annotation.GetMapping;
import org.springframework.web.bind.annotation.PathVariable;
import org.springframework.web.bind.annotation.RequestMapping;
import org.springframework.web.bind.annotation.RestController;

@RestController
public class TestController {

    @GetMapping("/test2")
    public String Test2(){
        System.out.println("Test2 ok");
        return "Alive2";
    }

    @GetMapping("/index")
    public String Test(){
        System.out.println("Test ok");
        return "Alive";
    }

    @GetMapping("/card/{cardId}")
    public String cardTest(@PathVariable("cardId") String cardId){
        System.out.println("Test ok" + cardId);
        return "CardId>>>" + cardId;
    }

}
启动TestApplication.java ,成功后在nacos 配置中心可看到对应的服务

4)验证
不经过网关 http://127.0.0.1:8001/test2
经过网关 http://127.0.0.1:8000/test/test2
经过网关的链接test/**,对应是nacos配置中心demo-gateway-dev.yml配置的路由。实际http://127.0.0.1:8000/test 对应demo-test服务http://127.0.0.1:8001/ ,所以 http://127.0.0.1:8000//test/test2 对应 http://127.0.0.1:8001/test2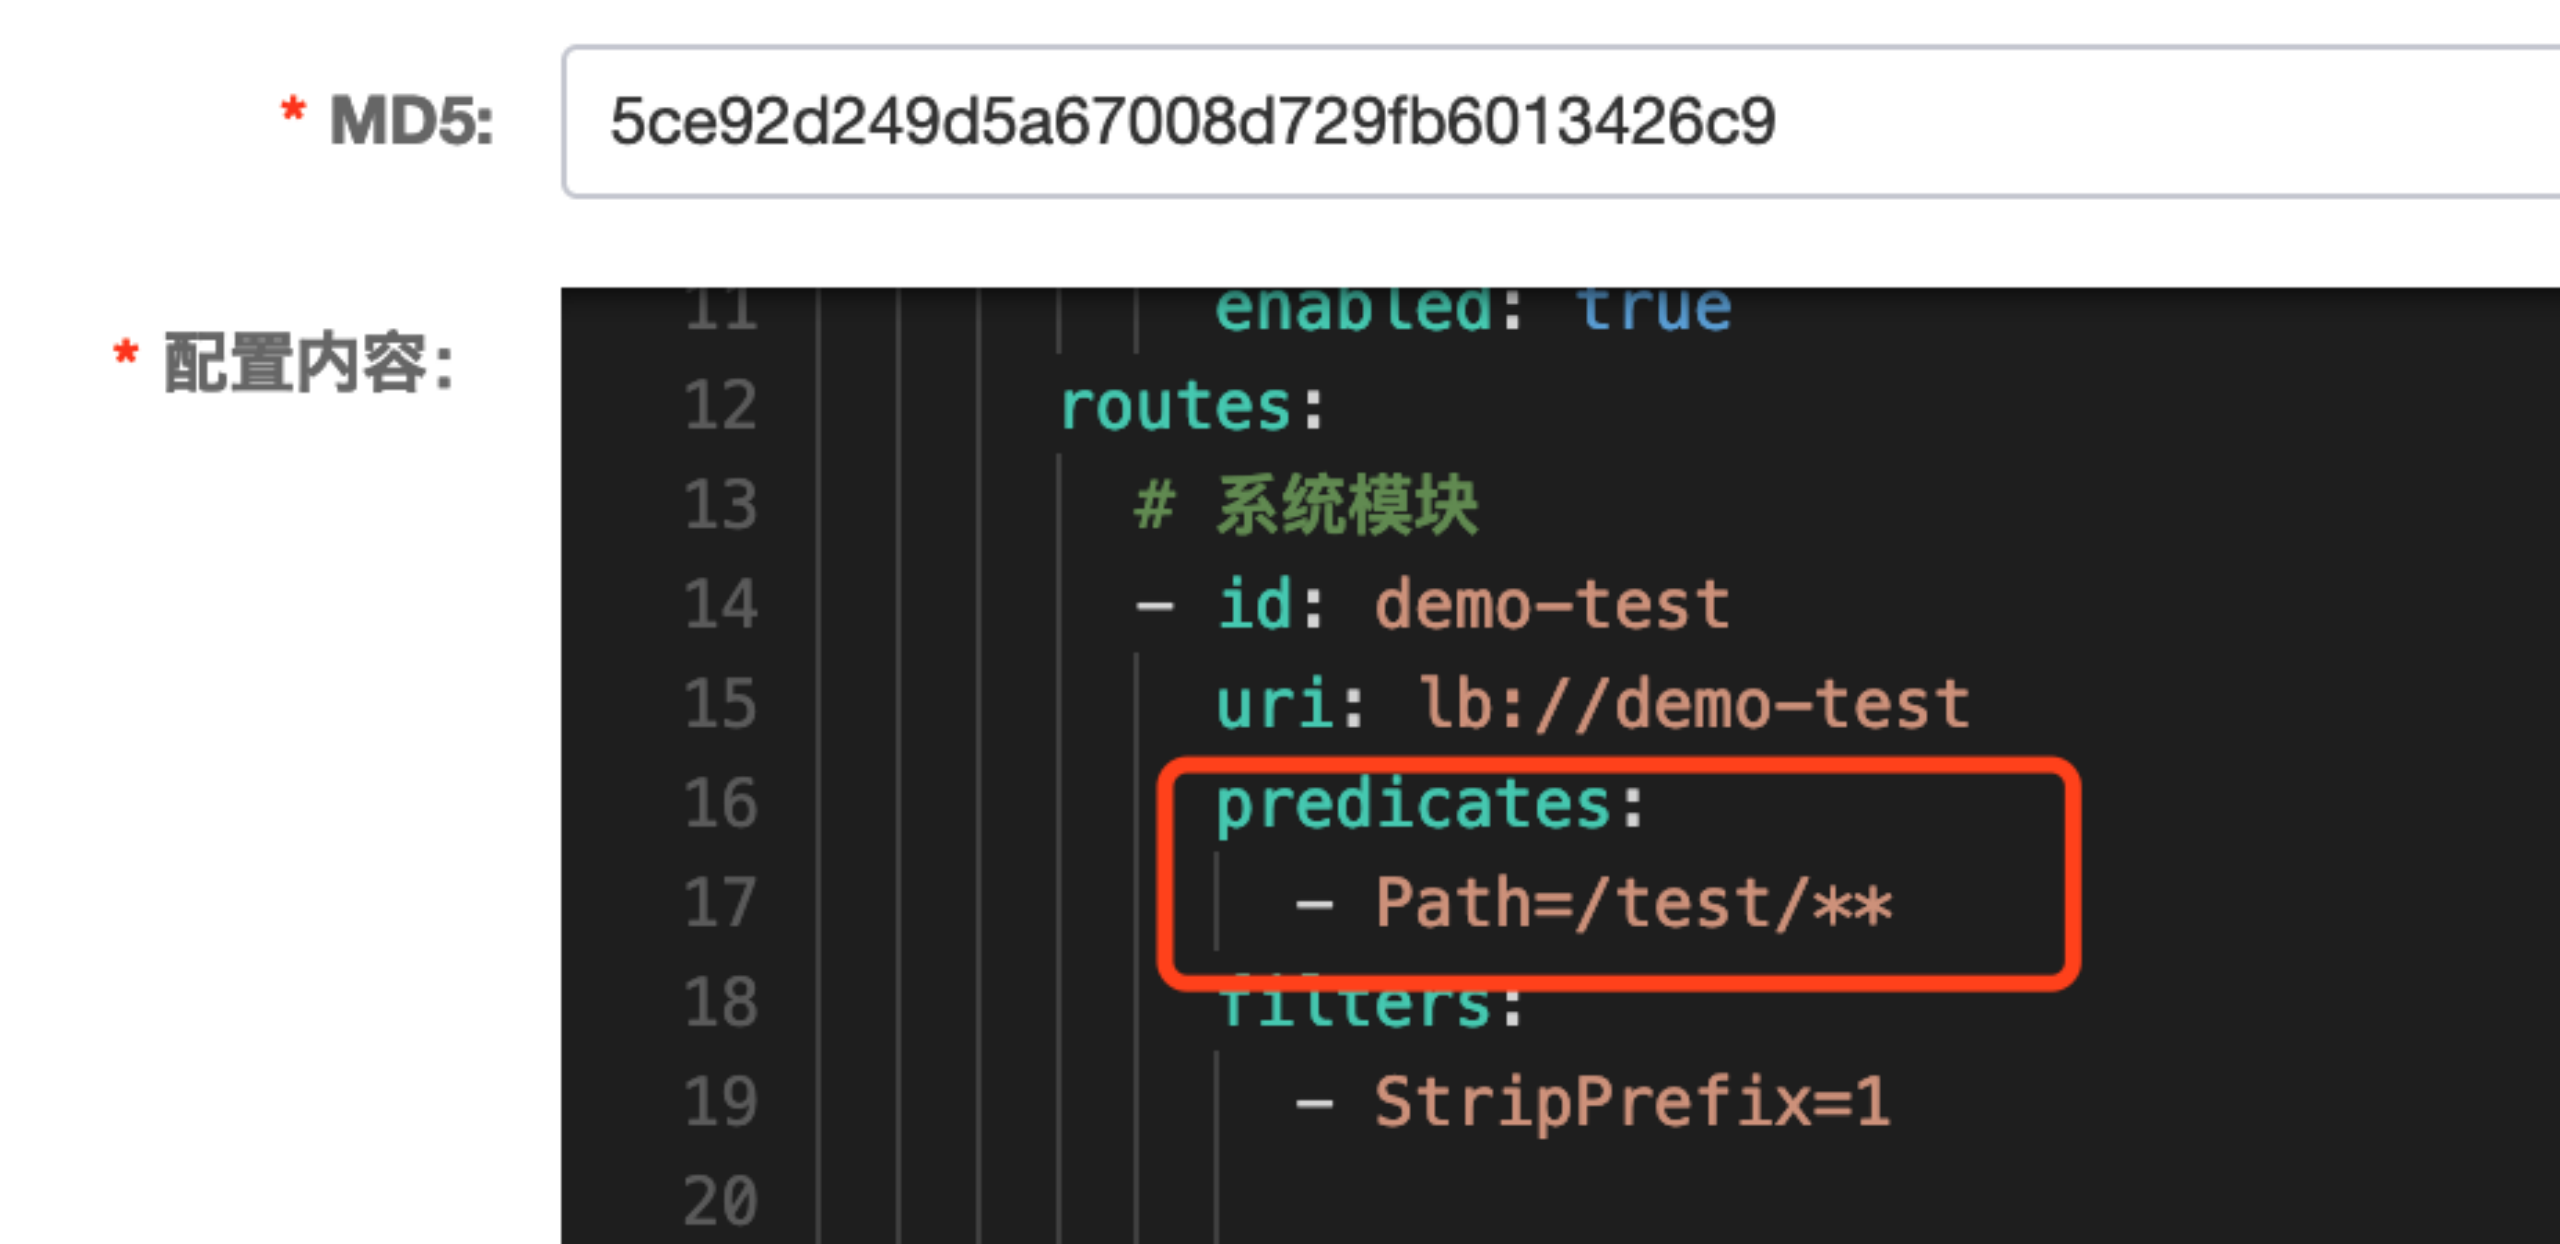

另外2个验证链接
http://127.0.0.1:8000/test/card/1234
http://127.0.0.1:8000/test/index
至此,完成